Wednesday, September 5, 2012

How to reveal hidden folders on a Samsung Galaxy S3

 In a recent guide I looked at hiding files on a Samsung Galaxy S3, now however I will show you how to reveal those files, allowing you easy access to whatever pictures, videos, songs or other files you felt the need to hide.
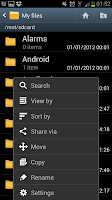

Firstly you need to open up the "My files" app which will leave you with a list of your visible folders (as you can see in the image on the left of the screen). On this screen you need to press the phone's "menu" button and scroll down the options menu until you come across a option called "Settings".


After clicking on "Settings" you will see a new screen with just 3 options. From this screen you need to put a tick in the box of the top option so that the "My files" app will start to show "Hidden" files. Remember all hidden folders begin with a "." in front of them and this will include the ones built into the phone as well as the ones you've added yourself.

After ticking the box to "Show hidden files" you need to press on the phones "back" button which will take you to the list of folders on your phone, which now includes ALL the hidden folders. As you can see in the screenshot on the right, my phone doesn't currently include many hidden folders (or files) though you can make as many hidden folders and files as you wish (though ALL will be shown when you tell the phone to show them).

How to find the Android Easter Egg on a Samsung Galaxy S3

As we all know Google like to add a lot of secret little Easter eggs to what they do and Android has, so far, not been any different with a number of little secrets tucked away. One of those has been the Android Easter Eggs that we first noticed back when the Samsung Galaxy S2 came out with the Gimgerbread version of Android. Thankfully for Easter egg hunters they've kept the same type of secret in the Samsung Galaxy S3 (and presumably all Android phones running Ice Cream Sandwich 4.0.3).

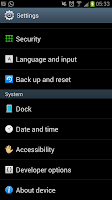
To find the Android Easter egg you need to start by opening up the Settings screen
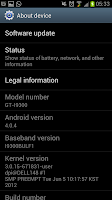
(see the screenshot on the left) and then scrolling all the way to the bottom where an option entitled "About device" appears. If you click on "About device" you will be taken to a pretty boring looking screen with a lot of options greyed out (see the screen shot on the right). For technophiles the information on this screen this is probably very interesting, for the rest of us however it's rather boring and/or confusing so ignore it all except the "Android Version" part. Instead tap where the phone says "Android version" a few times in quick succession.

After pressing on the "Android version" option a few times you will see the Android Ice Cream Sandwich icon/mascot on what looks to be a lake. If you press on him a few times he will come "closer" to you, almost skipping to the foreground. After a few presses the screen then changes to show an army of the mascot's flying across the screen from left to right.

There appears to  be no real reason for this to have been put on to the phone though it's again a nice treat from Google who have slowly developed what was once a still picture Easter egg, into a very interesting little bonus.

Please note-This has only been tried on a Samsung Galaxy S3, it will presumably however work on all phones running Android 4.0.3.

How to answer a call on a Samsung Galaxy S3


 Although we all like to think we know what we're doing when we get a new phone the sad truth of the matter is that we aren't all technologically able. So in this guide we're going to show you how to do the most basic of things with your Samsung Galaxy S3, how to answer calls. After all what's the point in having a phone if your not going to answer it?

When somebody calls you, you will see a screen like the one in the screenshot to the left. The screen will show a number (or name if you've saved the number and given them a name), an image in the middle (if it's a contact it will show the picture you've saved for the contact), two different icons-a green phone and a red phone, as well as the "Reject call message" (click here for more on that option) option at the other. From here answering a call is really easy.

When you receive a call you can either decline it, answer it, or decline it and send a message. To decline the call you pull the red phone to the centre of the screen, if you do this you will be taken straight back to the screen you were on prior to the call. If however you want to answer the call, you pull the green icon into the centre.

If you answer the call you will be taken to a screen like the one on the right handside. Again all the call details are at the top of the screen (the person's number, the country and even the length of the call) and at the bottom you have various options such as ending the call, using speaker phone and even using the keypad (in cases where you may need to use a dial tone).

Hopefully, this guide aimed at the newest owners of the Samsung Galaxy S3 will help you take those vital calls!

How to reject a call on a Samsung Galaxy S3 with a message

In a recent guide I showed you how to answer a call with a Samsung Galaxy S3 Android powered Smartphone and I also explained how to reject the call. Now however I'm going to explain how you can take a 3rd option of rejecting a call whilst also sending a message, that may be able to explain why you didn't answer the call.

As with the guide explaining how to answer calls with the phone we start at the receiving a call (see the image on the left) which features a red phone a green phone
and, more importantly for this guide, an option at the bottom. If you look carefully you will see the option at the bottom says "Reject call with message". If you click the option at the bottom you will notice that a short list opens up over the call screen with a number of relatively often used excuses for not answering the phone. If you press on one, the call will be rejected whilst the caller will be automatically sent the corresponding message.


So for example imagine if Dave rings whilst you're driving. Instead of rejecting the call (which Dave may find as you being rude) you instead click the "Reject call with message" option then select "I'm driving" so Dave gets the message. It's easy and it's quick, an excellent little feature that may well help you avoid annoying your friends whilst also not getting you into trouble elsewhere.

How to uninstall apps from a Samsung Galaxy S3

We all download apps at some point that we realise weren't what we really thought they were and so for this guide I'm going to explain how to uninstall apps from Samsung Galaxy S3. Whilst this guide has been written with the Samsung Galaxy S3 specifically in mind we expect it should work with any phone running Android 4.0 (Ice Cream Sandwich).

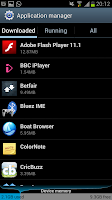
Firstly you need to open the settings screen of the phone. To do this you need to press the "Menu" button on the home screen and then press on the "Settings" option. This will open a screen like the image on the left hand side with a list of all the settings you can look at. Scroll down this list until you see "Application manager" and then select that option.

After selecting "Application manager" you will see a list of all the Apps that you've

downloaded on to your phone. From this list you need to scroll down to the app that you want to delete and then select it. For this example I'll be using the "Sporty Trader" app.


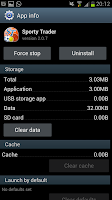
After clicking on the app you will see a screen like the one on the left which features the app's name and icon along the top as well as some of the apps information in the middle of the screen. From this screen you need to select the "Uninstall" option from top right of the screen.

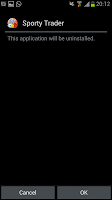
After clicking "Uninstall" you will then be taken to another screen that will offer two options along with a question. You can choose to "Cancel" the install, meaning that you won't uninstall the app (press this if you're about to delete an app by accident) or press "OK" to delete the app.

After pressing "OK" the phone will delete the app (this may take a while if the app is a large one) before the screen changes to tell you the app has been uninstalled successfully.

After deleting App the relevant icon will disappear from any homescreens that you have it on and the the space (memory) the app was taking up will become open allowing you to install an app in the same space as was previously being used.

How to set an MP3 as a ringtone on a Samsung Galaxy S3

 We all love to personalise our own phones in various ways, and one of the most common ways to personalise our phones is select our own ringtones. Sadly if you're using an Android phone, such as the Samsung Galaxy S3 things aren't always as easy as you'd wish them to be. For that reason I've decided to put this guide on here to explain how to select your MP3's as a ringtone on a Samsung Galaxy S3 smartphone.

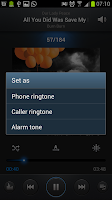
The first step is to open the "Music" application, the in-built music playing application, from here you need to find the song you wish to use. For this example I'll be using Our Lady Peace's track "All You Did Was Save My Life" (see the screen shot on the left). After finding the song select it to play and then press the phones "Menu" button to open up a contextual menu.

After pressing the "Menu" button on the phone you will see a menu that pops up over the album image of the track you've chosen to use (see the image to the right). This menu will have a number of options but the one you need to select is "Set as" which will be in the lower half of the list.

After selecting "Set as" you will be given 3 new options. Yo will be able to select the track as a a "Phone ringtone", a "Caller ringtone" or an "Alarm ringtone". From this menu you should select "Phone ringtone" to select the track as your phone's ring tone.

After selecting an option in the previous menu you will be taken back to the music playing screen. The music playing screen will have a swift message near the bottom telling you that the ringtone has been added (see the image on the right).

How to copy text from the web on a Samsung Galaxy S3

With mobile phones now becoming full blown mini computers we've found new uses for our portable gadgets include surfing the whole internet. Whilst on the internet however we are almost always bound to find something that we want to to quote, send to someone one or share in someway (i.e. E-mail) as a result we want to copy and paste things. This guide shows you how to do the copying part of that on a Samsung Galaxy S3 whilst using Opera Mini (though other browsers work in a similar method).

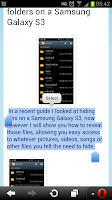
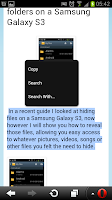
The first thing you need to do is find what you want to copy, in this case I'm wanting to copy part of a guide on this site. To do this I go on to the page I want to copy from (see top left) and find the specific text that I want. At the edge of that text I hold my finger on the phone and get 2 little blue markers which I can move to where I want by dragging them.

When I have all the text I want inside the blue markers I left my finger off the screen and get a new on the screen allowing me to "Copy", "Search" or "Search With..." from these options I obviously want to "Copy" the text. After clicking on "Copy" this text will be moved on to your clipboard allowing you to paste it elsewhere.